jemappelle.s

Powered by Blogger.
    • Home
    • Destinations
      • Bali
      • Sri Lanka
      • San Francisco
      • Gran Canaria
      • Sweden
      • New York
      • Italy
      • Paris
      • Guadeloupe
    • Food
      • Snacks
      • Main
      • Salads
      • Dessert
      • Smoothie Bowls
    • Other
      • Travel Tips
      • Bucketlist
    • Legal Notice
Becoming Vegan did not let me forget the good taste of pulled pork or Bacon. The most unhealthy things one can possibly eat, yet i have to admit when someone fries Bacon Sunday mornings, my mouth is watering as well. 
Anyhow most important while being on a vegan diet is to take your time and research, to create a good alternative. This is so essential to stick to your decision and avoid cravings. Replace good food with something even better, that is healthy and proper tasty. The best example for this is Pulled Jackfruit. I had never heard of it until i came across some healthy vegan channels and literally i've been running around town for 2 weeks until i finally found it. In Europe you can mostly find Jackfruit canned, be careful not to take the one with sirup. A lot of asian shops offer it.


Level: EASY
What you need:
Time: 2h // Tools: Oven, Pot
280g Jackfruit (canned in Salt water/rinsed)
2 Tsp Maple Sirup
2 Cloves Garlic
1 Tsp BBQ Seasoning 
0,5dl Water
1 piece vegetable stew
1 Tsp Smoked Pepper Powder
2 Tsp Vegetable Oil
2Tsp Tomato Puree (Tube)
 

1. Rinse your Jackfruit and pull apart with your Hands and a Fork, put into a Bowl.
2. Dissolve your vegetable stew in cooking water and add into the Bowl.
3. Add all other ingredients to marinate the Jackfruit. Best press your Garlic fresh.
4. Let the mass rest overnight, so it soaks really up the spices.
5. Add into a cooking pot with 2dl water and cook for 30min
6. Heat up your oven to 170°c and bake in a form for around 1h until the texture gets a bit crispy. 

Serve with Avocado on homebaked Bagels.
Share
Tweet
Pin
Share
No Comments
I've been searching for a long time to find a satisfying Bagel recipe, ending up with my own, taking the best ingredients out of all. What i could see was, that in every recipe there was added sugar to the dough somehow, whether with honey, sugar or maple sirup. I don't like sweet bread and insisted on having my Bagels as sugarfree as possible. I avoid also using wheat flour, while for many recipes it is indeed neccessary to have some type of white flour. So below alternative Bagels are vegan, refined sugar and wheat-free.

Level: Middle
What you need:
Time: 3h // Tools: Oven, Pot, Bowl
9 Bagels
1 Package dry Yeast (14g)
3 dl warm Water
5 dl Spelt Flour
1,5 dl fullcorn Rye Flour
1,5 dl Buckwheat Flour
1/2 dl Chia Seeds
1/2 dl Flax Seeds
3/4 tsp Salt
Chia/Sunflower/Pumpkin/Flax Seeds for Topping

1. Fill a bowl with the warm water and add your dry Yeast. Let it rest for around 10min so it activates.
2. Meanwhile add your dry ingredients (except for the Topping Seeds) into a big Bowl and mix well.
3. Add your warm water and stirr and knead the dough, until it forms a sticky, but solid mass
4. Cover your Bowl with plastic foil and place it in a warm area. Let the dough rise for at least 1h, best is 2-3h.
5. Heat up Water with a bit of Salt in a big pot.
6. Take your dough and seperate into 9 Balls. Press them flat and add the hole in the middle.
7. When your water is cooking, add the Bagels one by one and cook until they come to the top.
8. Heat up your Oven to 200°c (fan)
9. Take your wet Bagels and place on a Baking sheet on a baking tray.
10. Decorate with Seed and bake in the Oven between 15-20min until they are gold-brown.
Share
Tweet
Pin
Share
No Comments
An apple a day keeps the doctor away. Apple Pie in the morning will remove all your sorrow from last evening. The problem with cakes is usually, that they are quite big. So either you share or you eat it all up on your own. If you know the struggle, here's this little cake, which is adapted to the single household.


Level: EASY
What you need:
Time: 45min // Tools: Small baking form 9cm
3cm Banana Slice
Sprinkle Lemon Juice
1 Tbsp Oats
1 Tbsp Spelt Flour
0,5dl Plant Milk
1 Tsp Sunflower Butter
1/2 Apple
A pinch of Baking Powder
Cinnamon


1. Mash your Banana with a fork and add your Lemon Juice&Milk
2. Slowly add your Oats, Flour, Baking Powder and Butter
3. Oil your Baking form and preheat the Oven to 150°c
4. Add your dough in the Form and cut your Apple in small slices. Fan up like a rose and top on your Pie. Sprinkl with Cinnamon and Lemon Juice
5. Bake in the oven for around 30min or until the Top turns Crispy. The consistence of the cake below will have a fluffy Oatmeal consistence. If you like it more firm, add more flour.
Share
Tweet
Pin
Share
No Comments
Very shortly before my upcoming Trip to Paris, i decided that i need to taste one typical french dish: Crêpes. My mother and brother do really love them. Since i am allergic to milk and egg, i have never had the delight to actually taste them before. Luckily i found a recipe by simplyconny, which i used as inspiration for my coffee-kicking crêpes.


Level: MIDDLE
What you need (4 Crêpes):
Time:45min // Tools: a good (!) Pan
2dl spelt flour
1dl freshly brewed dark coffee
1dl Oat Milk
1 Tsb Coconut Sugar
1 Tbsp Coconut Oil (melted)
1 Tsp Baking Powder


1. Add all dry ingredients in a Bowl and stirr well
2. Melt your coconut oil and add it with your Milk to the mixture. 
3. Stirr the dough well and let it rest for 5min, the texture will be liquid, so easy to pour in the pan.
4. Heat up your pan, with a bit of coconut oil. Test if it's hot by letting a drop of water in. When the water condenses, the pan has a good heat. 
5. Now pour your dough and spread quickly by moving the pan in circles, let bake on one side, until the edge turns crispy and turn over to the other side. 
6. Serve with Soy Joghurt and Frozen Berries. I topped the crêpes with homemade Almond Butter as well.
Share
Tweet
Pin
Share
No Comments
Most about different Seasons i like the change of fruit and vegetables. Especially autumn has so many nice veggies to offer, i can hardly choose between mushrooms, chestnuts, so many types of pumpkins and roots. 
To finally start into the most colourful season in Sweden, i decided to start with an easy Pumpkin soup, since i have not yet made so great experience with chestnuts.


Level: EASY
What you need:
Time: 2h // Tools: Hand-Blender
1 kg Hokkaido Pumpkin
2x2cm slice Ginger
1 piece vegetable stew
400ml Coconut Milk Light
3dl water
(served with garlic-oil roasted spinach)


1. Wash your pumpkin and remove the top and bottom.
2. Cut your pumpkin including skin/seeds into squares
3. Add your pumpkin pieces andthe ginger with water and vegetable stew in a pot and cook until the pumpkin is soft and falls apart. Let cool down.
4. Use your handblender and blend all ingredients in the pot. Add on Coconut Milk and a pinch of Salt if neccessary.
5. Let the soup rest. It tastes best the next day, when all the ginger has settled. 
Share
Tweet
Pin
Share
No Comments
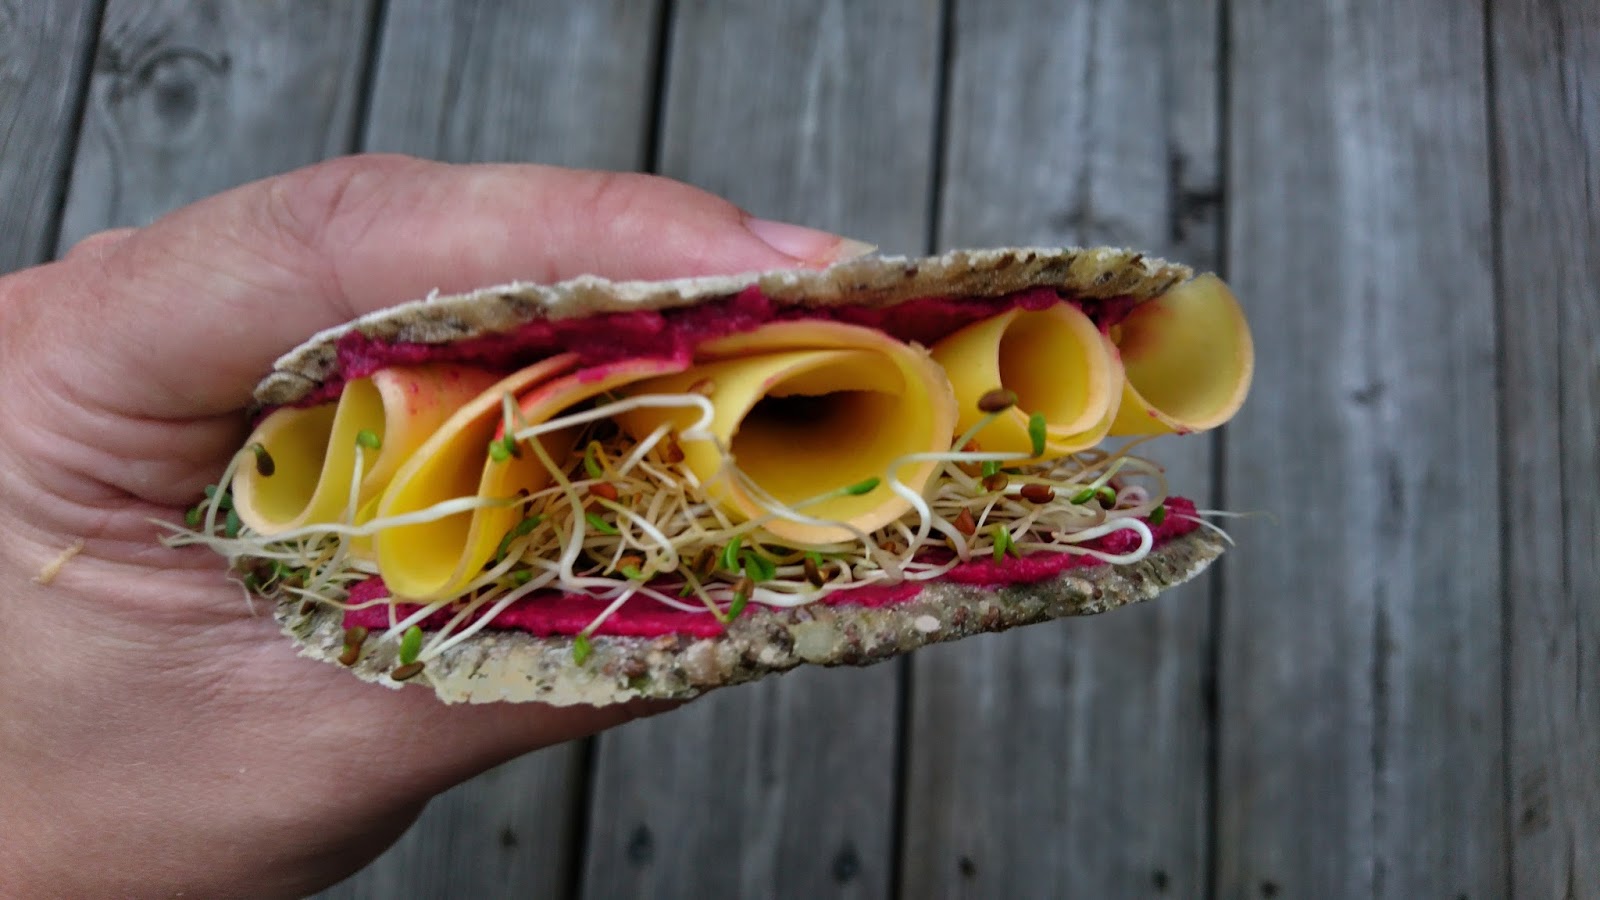
Inspired by the amazing bread at Écru in Rome, a raw vegan bistro, i decided to try my own raw bread, just hoping it would turn out nice, which it did.
As a perfect topping for any Sandwich, everyone recommends Beetroot Hummus. I am no fan of either of these two, but i had some leftovers and gave it a try anyway. 
The below Sandwich is also topped with avocado, homegrown sprouts and vegan mayo. Another seaonal nice topping is pumpkin carpaccio.
For all people who hate baking, this recipe is great, since you do not need to bake at all. Another plus:this bread is vegan and glutenfree and full of healthy power ingredients.


Level: EASY
What you need:
TIME: 30min // TOOLS: Blender, Bowl, 10cm diameter Cup, 1 Glass
BREAD (glutenfree, 10 pieces)
1dl Chia Seeds
2dl Buckwheat Flour
1 dl Sunflower Seeds
1 dl Pumpkin Seeds
1 Tsp Herbes de Provence
1 Tbsp Olive Oil
1 dl Water
Salt
BEETROOT HUMMUS:
1 Beetroot (cooked&baked)
150g Chickpeas (canned&rinsed)
1 Tsp Tahini 
Salt


BREAD
 1. Start with chopping your Sunflower & Pumpkin seeds into small bits with your Blender.
2. Put all DRY ingredients in a bowl and stirr well, before adding the Oil and Water.
3. Stirr the dough until it turns firm and can be kneaded by hand,without sticking to it (the chia seeds will soak in the water)
4. Spread a bit of buckwheat flour on a flat surface and roll out your dough with a help of a glass (if you do not have a rolling pin like me)
5. Roll out until it is 5mm thick and with your cup cut out round forms. 
6. Redo the process until you used up all dough 
7. Put your bread on a baking sheet and let dry for 2h in room, or 30min lowest temperature in the oven (turnover after half the time)
8. Store in a sealed box in the fridge for up to 7 days to keep moist and fresh
BEETROOT HUMMUS
This is really super easy, just put all above mentioned ingredients in a Blender, mix and spread on your bread afterwards. Enjoy! 
Share
Tweet
Pin
Share
No Comments
#wheninRome, me and my friend visited this fantastic Burger Place called Flower Burger, nearby Vatican City. Honestly their Burger Buns are amazing, coloured in black, pink and blue, one really wants to try all of them. Also they have a huge variation of Burger patties, all plantbased of course.
So to have an amazing throwback to that one time, i decided to make my own Rainbow Burgers.
Well, the buns are the trickiest party and especially it's hard to get them fluffy, if you do neither use egg nor milk. Also i learned, that using spelt flour as a more heathy alternative, always makes the dough a big more dry and hard. Anyway i got inspired by some typical american recipes, tried to veganize them and the first time i actually forgot the yeast. Imagine me, waiting for around 4h and nothing happened to the dough. I thought it might be to cold, so i still put them in the oven and got rewarded with some little rocks. I hate food waste, but these i needed to toss away. The second time it went definitly more smooth, while my patience was gone, i did not let the dough rest long enough, but in the end they were quite ok. So bring a lot of time, if you want to make fluffy Burger Buns.

Level: ADVANCED
What you need:
TIME: 4h // TOOLS: Blender, Bowl
BURGER BUNS 4PIECES
4dl Spelt Flour
1dl Soy Milk
1/4 dl neutral Oil
1 tsp Salt
1 Package dry active Yeast (14g)
Sesame
COLOURS
Blue: Blue Spirulina powder
Pink: Redbeet Juice
Orange: Kurkuma
QUINOA PATTIES (link)
VEGAN MAYONNAISE (link)

In total the preparation will take around 4h. So if you like the Burgers for lunch, better get up early. While most of the time the dough is resting, you can prepare the patties and other treats.
Start with blending all dry ingredients (flour, yeast, salt) in a bowl.
If you colour all your buns the same, you can already add your colouring now. Since i wanted all different, i coloured them afterwards (see below)
Slowly add Oil and Milk, start working the dough. Very important when using spelt flour is to not overdo it.
Now cover the bowl with a plastic wrap. While the dough is resting, it's important that no humity passes out the bowl. You will see small water drops start to develop, when the fermenting process starts.


Place the bowl close to the heating or in a warm place and wait for 2h. The dough should have approximately the double size now.
Now seperate the dough for your buns and form Balls. By now it is not possible anymore to add the colouring within the bun, because kneading the dough now will make it hard and dry.
Instead mix the blue spirulina with a bit of plant milk and paint your bun from the outside. The Kurkuma needs to be dissolved in oil to develop it's full colour. The redbeet juice is easiest to apply.
Let the now coloured Balls rest in small bowls (closed by plastic film) for another hour.
You will see they still grow.
Put the Balls on a Baking Sheet and tap them carefully in the middle, to achieve a bun shape.
Paint them one more time, before putting them in the preheated oven (150°c)
Bake for 10min and paint again. Now add your sesame seeds.
Bake another 10min until they are crispy from the outside.
Let them cool down and TASTE THE RAINBOW
(the blue and red bun almost taste like normal bread, while the orange really has a kurkuma hint)
Share
Tweet
Pin
Share
No Comments
This is a meatfree alternative for crispy Burger Patties. I am not a big fan of Quinoa, but anyway i bought it a while ago, because it is so healthy. This recipe helped me to like it a bit more.
Whether you form patties or small little meatballs, is up to you. While this mass is a bit lighter than my Blackbean Köttbullar, it is more a chicken alternative. 


Level: EASY
What you need (5 Patties):
TIME: 45min // TOOLS: Blender, Bowl
2dl Oats
1 dl Quinoa mixed (before cooking)
1 piece vegetable stock
1 Tsp Tomato Paste (Tube)
1 Tsp Mustard
1 Tsp Flax Seeds
2 tsp aquafaba (Chickpea Water)
2 tsp corn starch
1 Tsp neutral Oil
1 Tsp Onion Powder
1 Tsp Garlic Powder
Salt / Chili Pepper


Start with washing your Quinoa before cooking it. That removes a bit of the bitter taste. Cook your Quinoa with the vegetable stock, so it soaks in the spice. 
Now remove your water and add your cooked Quinoa in a blender. You will realise they actually soaked a lot of water, so to make the mass firm for our Patties, we need to add quite a lot of dry ingredients.
Start adding the oats, the flax seed and the starch. The flax seeds and starch are added to make the mass stick together, instead of an egg, as well as the chickpea water. Add all ingredients and blend until the mass forms a ball on its own. If your blender has a hard time, continue by hand.
Put the mass in the fridge for an hour, this will make it the perfect consistence for forming afterwards.
Form little Balls and then press them flat. If the mass does not stick to your fingers, it will neither in the pan. That means its perfect. If neccessary add more oats to get the texture.
Preheat your pan with a bit of oil and fry your patties from both sides until they are crispy. 
Serve in a Burger Bun or in any other dish.

Share
Tweet
Pin
Share
No Comments
Have you ever asked yourself, how the sweet potato fries in all places get so crispy? Everytime i tried to make some at home they just turned really soft in the oven. So obviously i thought they must be fried instead, which i absolutely not wanted to do. 
Nevertheless there are several tricks, which i have now collected, to make Sweet Potato Fries crispy in the oven, with a minimum of Oil. 
Anyhow the vegan mayonnaise i served it with, is kind of pure oil, making up for the non-fried fries.


 Level: EASY
What you need:
TIME: 2h // TOOLS: Blender
FRIES
1 Big Sweet Potato
3 Tsp Corn Starch
Smoked Pepper Powder
2 tsp neutral Oil
Salt
VEGAN MAYONNAISE
3 dl Rapeseed Oil
1 dl Soymilk
2 tsp white wine vinegar
2 Tbsp Aquafaba (Chickpea water)
Salt

FRIES
1. Peel your Sweet Potato and cut into approximately 1cm thick pieces.
2. Put them in a bowl of cold water for 1h in the fridge. This sounds super weird, but it helps the starch inside the potato to come out, which is important for the crispiness. 
3. Remove the water from the Bowl and add 2tsp of neutral Oil and the Corn Starch. Stirr well so the starch covers all fries. Now add your smoked pepper seasoning. DO NOT add Salt. This will be done before serving at the end. 
4. Now spread your fries on a baking sheet, leaving each single and seperate. 
5. Preheat your oven to 170°c and bake for around 30min or until crispy. My oven does not spread the heat equally, so i always have to check in between. 
While your fries are in the oven, you can prepare
VEGAN MAYONNAISE
Did you know that making mayonnaise is one of the most simple things ever. You need only a few ingredients and a blender.
1. Start with adding half of the Oil into a Blender with the Chickpea water and Soymilk. Add the vinegar and Salt as well.
2. Now blend until the mass turns slightly yellow and the oil is dissolved within the milk.
3. Add on the rest of the Oil and continue blending until creamy. If the Mayonnaise is too liquid, add more oil. 
Take out the Fries from the Oven and salt them slightly. Then dip into your Mayo and enjoy.
Share
Tweet
Pin
Share
No Comments
One of the most famous dishes here in Sweden are actually Köttbullar, small balls made of minced meat. Most of you might be familiar with them from shopping at IKEA, since swedish people also do eat other things, you will not find them all over the place (at least here in Stockholm)
I have never tasted original köttbullar, as they are always made with egg, which i am allergic to. Starting eating no meat, i came up with a vegan option, made of blackbeans. I tried several times and it is really hard to make them sticking together, but not ending up like dry little rocks.

Level: EASY
What you need (10 Balls):
TIME: 1h // TOOLS: Blender
230g Black Beans (canned&rinsed)
3Tbsp Oats
1 Tsp Onion Powder
1 Tsp Garlic Powder
1 Tsp smoked Paprika Powder
1 Tsp Mustard
1 Tsp Tomato Paste
1/2 Tsp Salt
1 Tsp Olive Oil
1 Tsp Flax Seeds


IMPORTANT: Only use canned beans, since old beans might not be soaked long enough. I use a package of ecological natural black beans 380g (230g when rinsed) and never experienced any problems. To be on the safe side, keep the rinsed water and add 1 Tbsp at the end, if your mass is too dry to stick together. 
Blend all your ingredients except for flax seeds in a Blender until it is a firm mass. If your blender strikes, continue blending with a spoon. Blend in the flax seeds and form little balls.
Heat Olive Oil in a pan until hot and fry your balls from all sides, until they turn crispy.
Preheat Oven to 130°c and bake for 40min. 
You can serve them in grilled Eggpant with Kale and top with Tomato and Cheese Sauce.
Share
Tweet
Pin
Share
No Comments
Well, hot summer days have been really rare here in Sweden lately, but anyway this didn't keep me from having an icecream marathon last weekend. The base for all (n)icecreams i made, is of course always Banana, i store almost a kg in the fridge for emergencies. 
If you crave for chocolate, but like it a bit healthier to avoid bad feelings afterwards (it's refined sugar free), here is the perfect solution.
Level: EASY
What you need (2 Portions): 
1 fresh Coconut
3 frozen Bananas
1 Tsp Lemon Juice
2 Tbsp Soy Joghurt
3 Tbsp Cocoa Powder
3 Tbsp Cocoa Nibs
1 Tsp Coconut Oil
Pink Dragonfruit Powder
Blend the Bananas, Juice, Joghurt with the Cocoa Powder and Oil in a High speed Blender. Stirr under 2 Tbsp of Coconut Nibs and put your cream in the freezer. Every hour take it out and stirr to avoid ice chrystals. When you achieved the sorbet texture, take it out and serve in half a coconut. Top with the rest of the Cocoa Nips and an Orange Slice. For the pink decoration, mix Pink Dragonfruit powder (rawnice) with a spoon of Joghurt and a bit of Lemon Juice until flouid. 
Good thing is, that you can freeze the other portion inside the coconut for later as well, but sharing is caring so have a friend over and appreciate this dark bomb. 
Share
Tweet
Pin
Share
No Comments
There are a lot of things, that are good about living in Sweden actually. Although i might sound quite negative very often, i have found a few things i absolutely adore here. One of these is the next level of avocado toast (we have all seen enough of them) - Chantarelle Toast. 
I do it the most swedish way anyhow possible. Since i have never eaten Chanterelle at all before coming here, i started some addiction quite recently after trying them for the first time. 
Level: EASY
What you need:
100g Chanterelle 
1 Clove Garlic
Olive Oil
Oatly Pamackan (Creme Cheese)
1 Ragbröd
Fresh Rosemary
Fling Salt&Pepper
First there are a few basic rules when picking chatarelle at the supermarket. Do not take the biggest ones, although it might look tempting. Especially for the toast the middle sized ones are perfect. Also do not take too dirty ones and pay attention to the colour, which should be freshly orange. You can see best, if the chanterelle are good on the inside umbrella of the mushroom. The structure should be clearly visible and not looking dry. Sounds like expertise, yes it is!
Clean your chantarelle and cut off a small part of the root and seize them into halfs. 
Heat up olive oil in a pan and add your garlic. Most important when frying the mushrooms is, that the pan is already very hot, once you add them.
Add the chantarelle and fry for approx 10-15min until they have a saturated colour. 
Spread your cream cheese on the very typical swedish ragbröd, which you can buy at any bakery or supermarket. 
I always use Oatly Creme Cheese, but you can use also any other brand. (Oatly is  a swedish brand offering a large range of dairy free products, made from swedish Oats, SUPRISE )
Add your chantarelle while they are still hot, so the cream cheese will slightly melt on your bread. Spice up with  Fling Salt&Pepper and fresh Rosemary. 
Share
Tweet
Pin
Share
No Comments
Honestly, how hard can it possibly be to find the right smoothie bowl texture?!
Either it is too hard, when freezing after blending or it basically melts away. For the first time i actually achieved the perfect temperature/combination of frozen and fresh fruit, which made me just so HAPPY. 
This Nicecream is maybe not the best breakfast (i prefer warmer treats) but you can easily have it in the afternoon on a hot summer day (not often here in Sweden)
Serve with Chocolate Balls for the ultimate treat.
 Level: EASY
What you need:
NICECREAM
2 frozen Bananas
1/2 fresh Banana
100g frozen Raspberries
1/2 Tsp Vanilla Powder
100ml Soyjoghurt
1 Tsp Lemon Juice
BALLS
Bottom leftovers Choco Coco Cake
Start with your soyjoghurt, lemon juice and a few pieces of frozen Bananas. I have a hand blender, that actually has quite a hard time when it comes to frozen things. Blend and add bits and bits of your frozen fruits until you get a firm icecream/sorbet texture. 
Now you need to hurry, because it melts super easily. Decorate with wild roses (the petals are eatable), a piece of lime and chocolate balls. Serve cold as ice and enjoy!
Share
Tweet
Pin
Share
No Comments
For over a year i could not make pancakes, because i had an old pan. How annoying is that?!
Thing is, that pancake making is an expertise on its own and i have never been really good at it. 
So lucky me, i have gotten a pan from my friend (perfect size and best present ever). I love when people give you stuff you actually need. Especially these house tools, i am too stingy to spend the money on it. 
Anyway first Sunday after i got this amazing pan , i decided its time for another try. I prepared the pastry one night before and stored it in the fridge, so when you wake up you can directly start frying.
These Pancakes are without added sugars, the sweetness mainly comes from the ripe Banana. You can make them glutenfree, if you use another flour (and they are vegan of course)
Level: ADVANCED
What you need:
a very good new pan! 
PANCAKES
1 very ripe Banana
1 Tsp Lemon Juice
1dl Oatmilk
1 Tsp Coconut Oil
1 dl Spelt Flour
1 dl Water
1/2 Tsp Vanilla Powder
1 Tsp Corn Starch
1/2 Tsp Baking Powder
TOPPING
2 Tbsp Sunflower Seeds
1/2 Apple
1 tsp Coconut Oil
1 slice orange
2 Tbsp Soyjoghurt
Vanilla Powder
Cinnamon
Prepare your pastry by adding Banana and Lemon Juice in a Bowl. Start mashing your Banana with a fork, until its a fluent mass. Add on the rest of the ingredients and stirr very well. The pastry should be liquid, so easy to pour into the pan. The starch helps it to stick together, instead of an egg.
Heat up your pan and add a tiny bit of coconut oil. It should be really hot when you pour the pastry into it, so the pancake directly starts to cook. 
This is really serious business, since you hardly know when you can turnover the pancake. I discovered that with these ones you can see that one side is ready, as soon as the air bubbles inside escape to the top. 
If you are professional you can try to flip your pancakes, but i use a normal spatula.
Don't get discouraged, the first one looks always shit. 
For the topping mix the juice of 1/2 slice orange with vanilla and soyjoghurt.
Then start roasting the sunflower seeds with a bit of coconut oil in a Pan. 
Cut your apple in small pieces, i used a very old one (they get much sweeter after a while).
Add your apples and spice them with cinnamon. Fry until they are slightly crunchy.
Decorate on your plate and enjoy
SUNDAY IN BED WITH PANCAKES
Share
Tweet
Pin
Share
No Comments
Well what's all the fuss about Unicorns? I totally didn't get it until it came to be a new trend for food colouring, something that is actually fun and useful. Honestly no one needs unicorn toilet paper, but everyone will love this unicorn (poop) icecream or?
BIG THANKS to Rawnice, who made this dream come true. I recently won (for the first time in my life something) a megabundle including spirulina, dragonfruit and butterfly pea powder. Their stuff is amazing, let the colour games begin!
BTW if you have never opened a coconut before, watch some youtube tutorial and get the right tools, then it's done within a few minutes. 
Level: EASY
What you need:
1 Coconut
3 frozen Bananas
100g Soyjoghurt
1Tbsp Lemon Juice
1 Tsp Blue Spirulina
3Tbsp Pink Pitaya Powder
(2Tangetes Flowers, optional)
Pastry Bag
Add your joghurt and lemon juice (it prevents the Bananas from turning brown) and a few pieces of frozen Banana in your Blender. Before you freeze your Bananas, always let them ripe completely and cut them in small pieces max 3cm slices. This makes it much easier for the machine. 
Add on until you get an icecream like texture. Take out approx 1/3 of the mass and blend in a seperate bowl with your pink pitaya powder. 
Add your blue spirulina in the blender and blend until it turns smurf blue. 
You need to freeze the cream before serving, so the colour also spreads more evenly and the texture gets like proper icecream.
Take 2 empty ice cream boxes (they are the best, because they prevent ice crystals mainly) and put in the freezer. Every hour remove the cream and stirr well, to avoid getting an ice block.
When you achieve the perfect sorbet structure, open your coconut and by using a pastry bag add the creams into your bowls. Start with blue in both bowls and add the pink, while there are still rests of blue in the bag, then you get a nice flow. Decorate with Tagetes and start believing, that
ONE DAY UNICORNS  MAY COME ALIVE 
Share
Tweet
Pin
Share
No Comments
ATTENTION! This is to all the dark chocolate lovers outside, that can never get enough. I have to warn you this cake is not only delicious, but very heavy as well. I doubt it is actual healthy, but there is very less sugar in it! And it is vegan and glutenfree, so that's kind of good for your body isn't it? 
The recipe below is for 12 servings, but only if you have very hungry chocolate people over -
Your TRUE FRIENDS so to say! 
Level: ADVANCED
What you need (12pieces):
BOTTOM
300g soft Dates
3 Tbsp Coconut Oil
2 dl Oats (glutenfree)
5Tbsp Cocoa
2Tbsp Nut Butter(or sunflower butter)
3 Tbsp Buckwheat
3 Tbsp Cocoa Nibs
(Water)
CREME LAYER
300g 81% Dark Chocolate
2 cans - 800ml Coconut Milk (full fat)
1 Tbsp Maple Sirup
1 Tbsp Agar Agar
You need a big squared form for this cake, approx size of a DINA4 Paper. I used a glass form from Ikea, but i would recommend a silicon form, so you can remove the cake more easily. 
Spread some coconut oil in whatever form you use, and start making the bottom layer. 
Add all ingredients except for buckwheat and cocoa nibs into a blender and mix. The mass has to form a ball, so if it is too dry, add a bit of water until it sticks together.
Add your buckwheat and cocoa nibs add the end to have some crispy effect in the layer. 
Spread evenly in your form about 1,5cm thick and put in the freezer. 
Seperate the water from the coconut milk and only use the creamy part. You can store the milk in the fridge the night before. Keep apart 1 Tbsp for decoration afterwards.
Now melt your chocolate bars and add the coconut cream. Stirr well until it turns into a creamy fluent mass and add maple sirup and agar agar. Cook for a bit so the agar agar will start working. 
Now you have to work fast, since as soon as the mass is cooling down, you can not draw in your top layer anymore. 
Take your form from the freezer and fill in your fluent chocolate, then use the leftover cream to draw your favourite pattern into the top layer. 
Freeze again to speed up the hardening process and remove from the freezer approx 1h30min before serving. This cake will not melt away, but you can store it longer and prepare in advance, when you use the freezing process. 
Start your CHOCOLATE OVERKILL now! 
Share
Tweet
Pin
Share
No Comments
Celebrating my Birthday and one more year of wisdom, i decided to level up my cake game and try out a new pink sensation. Originally this was supposed to be a Strawberry Cake, but the weather has been unfortunately bad this summer. Especially in Sweden it is almost impossible to get nice Strawberries, so i went with frozen Raspberries instead. The best combo with this little sweet berry is of course dark chocolate. The bottom layer is the same as i used for my frozen Banana Cake recently, because it's just working always and leftovers can be used to make little energy balls.
PS: There is no added sugar in this Cake, so you can enjoy it completely WITHOUT REGRETS
Level: ADVANCED
What you need:
BOTTOM
100g Soft Dates
3 Tbsp Oats
1 Tbsp Buckwheat
2 Tbsp Coconut Oil
1 Tbsp Almond Butter
(1 Handfull Cashews)
3Tbsp Cocoa Powder
Water
RASPBERRYLAYERS
1 Can (400ml) Coconut Milk Cream (Full Fat)
3 Tbsp Agar Agar
250g Frozen Raspberries
TOPPING
Cocoa Nips/Mint
15cm Springform
Start blending all your bottom ingredients, except for Buckwheat in a high-speed Blender. The mass has to be sticky, so in case it does not hold together, add a bit of water, until it forms a ball in the machine. That's the perfect consistence. Add Buckwheat last and mix under, so you got some crips in the layer. 
Oil your springfrom with Coconut Oil, so it's more easy to remove cake later. Add the Bottom layer, so it will be approx 1cm high. Put in Freezer while preparing your cream layers.
Now blend your frozen Raspberries, until they have a smooth texture. We will cook them anyway, so you can remove them from the freezer earlier, if your blender is not that strong.
Store your Coconut milk in the fridge the night before to seperate Cream and Water layer, we only need the cream layer. 
Heat up the Coconut Milk and add 1 Tbsp Agar Agar. When the gelantine starts to work, spare 2 Tbsp for white layer at the end.
Start adding Raspberries and 2 Tbsp Agar Agar, while creating the different layers. The more raspberries you get, of course the more colourful it becomes. Save all layers in different pots and let them cool down a bit. 
Add your first layer to the Bottom layer and freeze for 1h or until it is firm. Then continue adding the other layers with same procedure. The final layer you can use for some decoration drawings and cocoa nips. 
To achieve layering you need to freeze the cake, which will end up in an ice block at the end. To avoid ice crystals put your Springform in a Tupperware and remove Cake 1h before Serving. 
Share
Tweet
Pin
Share
No Comments
Digging deeper and deeper into vegan cooking and testing vegan restaurants, i came across cashew cheese quite often. There are endless possibilites and the best of creating your own cashew cheese is the individual flavouring. This example below is spiced with different Herbs, but you can also try a chili, red pepper and so many more.
All good things are worth waiting for and with cashew cheese it's particulary a tough time until you finally get your treat. The longer you wait, the harder the cheese gets. Mine rested for around 24h and has a firm form, but a creamy inside. If you are more patient, you might even get a slicable cheese. 
For this recipe you need a few special ingredients, which you have to order online or shop in special vegan shops. In Stockholm i can recommend goodstore. 
Level: ADVANCED
What you need:
200g Cashews 
1 Clove fresh Garlic
1 Tsp Garlic Powder
1 Tsp Onion Powder
1 Tsp Thyme
1 Handful Fresh Basil
1/2 Tsp Salt
2 Tbsp Lemon Juice
2 Tbsp Nutritional Yeast
2 Tbsp Olive Oil
1 Tsp Corn Starch
1 Tsp Agar-Agar Powder
1 dl Water
1 Springform around 10cm
Linen Cloth/Cotton Fabric
Soak your Cashew Nuts overnight in water, really make sure they are soft. Keep in mind whole cheese making needs around 2 days time from the moment you start. 
Next morning you can actually start making your cheese.
Start with blending your Cashews in a high speed blender until the mass is really creamy. It can take some time, but be patient. 
Add Lemon Juice and Olive Oil to make the mixture even more creamy. Now you can add your fresh garlic, you do not need to precut it, but blend with the mass for a while.
Afterwards add corn starch and yeast, so the mass will start to get more firm.
Heat up 1dl water and add your agar-agar. Cook up for a bit until it turns jelly and add into your blender. Blend again so the agar will spread evenly.
Add salt, pepper, thyme, onion and garlic powder and blend in. Add the end cut your Basil leaves roughly by hand and mix under.
The mass should be creamy but firm and will continue to get stiffer as soon as the agar agar cools down. 
Spread a linen/cotton fabric in your springform. This will help later to get your cheese out of the form and dry if you want a hard cheese. 
Fill the mass into the cloth and press down firmly. You will realise as well that it will stick onto any tool you use, so cover the top with the linen sheet as well and press down. 
Let the cheese rest for at least 12h (better 24h) in the fridge before you open the springform. By then the cheese will have taken the shape and last on its own. The cotton cloth helps now to release water.
As said i waited only 12h and again 12h without springform, but the cheese is still quite creamy.
Do not touch it in beween or test how hard it is, because this will interrupt the process again.
If you want a faster result, you can also add more agar agar, which will speed it up, but i fear the cheese will taste more jellylike. 
Waited long enough? Serve your homemade cheese with freshly baked Sweet Potato Bread!
Share
Tweet
Pin
Share
No Comments
Baking is always a really tricky thing. I have to say i am not good at actual baking, that's why i usually make raw cakes or easy bread like my Chia Knäckebröd. 
After a number of tries, i happen to found the right amount of flour to create a nice sweet potato bread, which is crispy outside and moist inside.
Actually the first time my bread doesn't end up as a stone!
I can literally have sweet potato in almost everything, but i have to say it fits extremely good here. 
Level: ADVANCED
What you need:
1/2 middle size Sweet Potato
3 dl Spelt Flour
3 Tbsp Olive Oil
1 Tsp Corn Starch
1 Tsp Baking Powder
1 Tsp Dry Yeast 
Salt&Pepper&Seeds
Making nice fluffy dough for bread takes a while, and probably cleaning up the kitchen afterwards as well. So take your time for this.
Cook your Sweet Potato in water and remove all water from the pot, before you blend it. 
Let your sweet potato mass cool down a bit, before adding it into a big bowl.
Add 2dl of Flour and 2 Tsp Olive Oil, as well as a pinch of Salt. Start to stirr with a spoon, since the mass will stick to your fingers. 
Add the Starch and Yeast and let the dough rest for a few hours in the fridge. 
Add now 1 dl of Flour again and your Baking Powder. You might need a bit more flour, depending on how much water your potatoes soaked. Add Flour until you can form the dough, without it sticking to your hands. If you feel it gets to dry, add another spoon of Olive Oil, not water. 
Now form 2 equal strings with your dough and roll out. 
Start braiding (you can find several tutorials on youtube) and place on a baking sheet.
Preheat your oven to 50°c.
Now the yeast needs to start working, since in summer the heating is off, you need to do it in the oven.
Place your bread in the oven for 1h. You will see it grows to the approx double size of its original.
Paint the bread with Olive Oil and spread Seeds and Salt on Top.
Now bake for 30min approx 150°c.
If the crust turns slightly brown, you know its ready. 
Best served fresh, but you can store it in the fridge (in a tupperware) for a few days so it doesn't dry out.
Serve with cashew cheese or pesto. 
Share
Tweet
Pin
Share
No Comments
Older Posts

About


S//TRAVEL//VEGAN FOOD


Follow

  • Instagram

FEATURED

Paris is always a good idea

Well i honestly can't say how very often i actually have been to Paris, but this is my very favorite city in the world. Even New York c...

Labels

  • Accomodations
  • Bali
  • Dessert
  • Food
  • Gran Canaria
  • guadeloupe
  • Italy
  • Main
  • Money
  • New York
  • paris
  • Salads
  • san francisco
  • Smoothie Bowl
  • Snacks
  • Sweden
  • Travel Tips

recent posts

BeautyTemplates